3 Chapter 3. Data collecting
Learning Objectives
Reading as much as possible about the study area before getting in the field is a first step. But collecting data in the field in a random way it is going to hinder the research. Consequently, at the end of this chapter the student will
- realize the importance of recording the collected data in an organized manner.
- understand that the recorded data could be used by other researchers in the future.
3.1. Introduction
You’ve read about Avonlea Badlands, and now you have an idea about relief, vegetation, climate and rock type. You’ve prepared the geological tools needed for your field trip. Now, let’s get closer. Let’s see how you can set up our field notebook for ease of understanding and what data to collect in the field so that you can analyze and interpret the ancient environment. Remember that the more data you collect in the field, the easier will be to look at the bigger picture in the lab!
3.2. Setting up (the right way) the field notebook
One of the most valuable skill in the field is the ability to take clear and concise notes. And it is a skill that is often overlooked by the student in geology. Our tendency to write down everything makes it for a long and messy process. Before you start writing down like a madman, there are a few things to remember:
- Use only rite in the rain notebooks. Yes, they are more expensive, but there is no value for the amount of work and data that you’ll loose if the notebook gets wet and the pages rip under the weight of water!
- Use only a pencil when in the field. Even if the pages will get wet from rain, snow or any other accidents, the lead from the pencil won’t leak. Please do not fall into temptation of using pen because it is easier accessible. You could loose all your data!
- Keep your handwriting as legible as possible. Someday, somebody else might need your field notebook and if they cannot understand your handwriting, all your work will be lost. Even if you have a messy handwriting, make an effort to keep your notebook as organized as possible.
- Draw sketches if applicable! A picture is worth a thousand words, and geologists prefer sketches to words anytime possible.
- Remember to record anything out-of-the-ordinary that happens like: bear sightings, bull running after one of your classmates, patch of blueberries where everyone stopped and eat, etc. All those seemingly unimportant events will play a major role in triggering your memory down the road. You’ll be surprised with which clarity you’ll remember the colour, the texture, the rock type of an outcrop once you remember that it was that specific outcrop where you have seen the bear! So, if there is anything funny, scary, out-of-the-ordinary that will trigger your emotional memory make sure to write it down! If nothing else, at least to break the monotony of collecting data.
It sounds complicated, but really it is not. Yes, it takes a little bit of discipline and a little bit of willingness to be uncomfortable in order to train yourself to take succinct notes that will tell a full story. Consequently, let’s see what are some of the best practices used by geologists in the field to set up their notebook properly.
The first thing to remember is that the field notebook is your witness to all the observations in the field. At minimum it should contain information about the rock types, mineralogy, fossils, and structures. But, let’s start with the beginning. In the field, there are a few small but important notes that you should make before you even start looking at the geology: the date, the time of the day, the weather, the stop number, and the name of your teammates.
The date is a very easy to understand, right? It makes a difference if you’re looking at the outcrop on May 19, 1992 or on July 23, 2021. The geological processes do not sleep; they act continuously shaping and reshaping the way a feature looks like. On top of that you should not discard the power of anthropological processes. The humans have the power to change everything beyond the point of recognition and what might have been an outcrop in a middle of a hill in 1992 might be the basement of a 3-story house in 2021.
The time of the day is important because what is easily visible in the morning can be obliterate by the light in the afternoon. The trip of the Earth around the Sun changes the shadow pattern of the object but also some features are better seen when using shade as an ally. As a fun story, we were in the Rocky Mountains looking at the pattern in the folding on Cascade Mountain in Banff National Park. It is a beautiful place, and if you have not seen it yet, you should definitely travel there! Anyway, on that precise day, we were there at the right time to notice something that we have not noticed before: a house-like structure halfway up the mountain on the exposed face. There were no trees and no roads visible nearby that structure. For awhile, all of us wondered how could we have not noticed that structure before, considering that we stop at this precise location every year for our Geology 396 field trip which is pretty much at the same time of the year. After wondering and pondering how that could be, somebody gave us a pair of binoculars and we started looking for that feature on the mountain, but we could not find it! We scanned the side of the mountain a few times until somebody noticed something that made us laugh! There was no structure! It was just an optical illusion created by the shadow of a geological layer! In the folding, a piece of a layer broke off creating a small shaded area topped by the white of the rock making look like a small house. That optical illusion is visible only for a few minutes, maybe a few hours during the day! Consequently, if you take a picture of a feature, make sure you note if there are any shaded areas.
The weather is pretty much as important as the time of the day. There is the obvious difference between going out in the field in the winter when everything is covered by the snow or in the summer when everything might be lush and green. But there is also a more subtle psychological difference. Let’s say you went out in the summer, the temperature are above 40 degrees and you have not packed any water. By the end of the day, your mind might start playing tricks on you. The same might happen if it a very cold day or if you’ve been working all day in the rain. Making notes of the weather will help you in correcting for some possible human errors in the collection of the data.
The stop number is a very important element that you should decide upon before you start your work. Numbering 1, 2, 3, etc might work for a short period of time, but eventually you’ll run into issues. Can you imagine if you’d start with number 1 every day? After a while you wouldn’t remember about which stop number 1 you’re talking about. Consequently, if you’re planning to use a sequential numbering scheme make sure that you keep numbering. Let’s say you’re previous work finished with STOP 20. Next time when you go out, instead of starting at 1 again, you could continue with STOP 21.
The same rules apply for collecting samples, in which case, the numbering system is even more important. Think about it before you start! Relabeling the samples can turn into a real ugly chore! Instead of using a sequential numbering scheme, use a more complex one that will also provide more information. For example, let’s say that we have been collecting 10 samples in 2020 and the team was made by Maria and Monica. One way of labeling the sample that will give the most amount of information is 20 – MM – 01. This will indicate that the sample has been collected in 2020 by Maria and Monica and this specific sample is number 1 of that series. If you go out in the field every summer to pick samples, this numbering system will be a life saver.
The last “small” detail is the names of everyone in the team. This detail provides extra memory access. If you forget a detail you can always go back to your team to discuss and debate.
Now that you have set up the stop, time to get cracking on the geology details. The first things to mention are absolute coordinates, relative location, and elevation. After this phase, a sketch of the area and then detail work depending on what you’re planning to do.
The absolute coordinates can be determined with a GPS or even with the cellphone. The coordinates can be given either using the latitude and longitude or the UTM systems. In North America, the UTM coordinate system is commonly used, and so it the Township and Range system.
The relative location is the description in words on how far or close it is the study area to some easily recognizable landmark.
The elevation can be determined using the altimeter – just make sure that it calibrated before, the GPS or even the cellphone. The elevation can be measured in m or in ft, depending on which system you are more familiar with.
The sketches are very important as during the drawing part you have to carefully observe and make mental note of geological and geographical elements, relationships between units, and area of interest. Note to self – geologists love sketches!
Now, that we briefly mentioned all those elements, let’s talk about the setting of the field notebook for this project. Because you’re going to work on vertical sections, keep one page for the sketch and the other one for the notes as in Fig. 3.1.
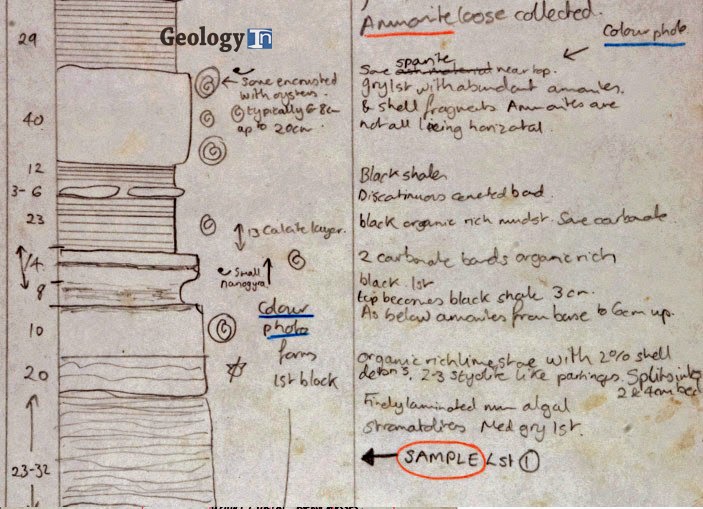
Setting up your notebook like in the figure 3.1. takes a little bit more time than just randomly writing all that information. But, if you are disciplined, if you convince yourself of the benefits of doing this way, you will be happy that you did it. Why? Let’s have a look in more detail of the Fig.3.1. and look at all the elements.
To start, you notice that the field notebook is divided on two parts: a sketch page and a comment page that go hand in hand. On the sketch page on the very left it is the thickness of the beds. The first one, from the bottom, has a thickness that varies between 23 and 32 cm or inches – depending on the unit. Make sure you mention the measuring unit on the field notebook, otherwise it will be completely impossible for somebody to recreate or interpret your work. The next column it shows the relative grain size in the case of siliciclastic rocks or the percentage above 10 % of grains larger than 2mm in the case of carbonate rocks. To further explain, the wider the column the coarser the grain size, or the higher the percentage above 10% of carbonate grains over 2 mm. In the same columns there are symbols showing the type of sedimentary structure encountered. Thin parallel lines are the equivalent of fine laminations. Don’t worry about not understanding all the symbols at this time. In most cases, you’ll be provided with a list of standard symbols to help you draw your own vertical section or understand somebody else’s. The next column shows schematic notes indicating different types of fossils encountered, presence of nodules or any other things that can be represented using symbols.
The opposed page to the sketch includes notes that are related to each unit. Basically you start at the bottom of the page and you’re trying hard to fit the comments in the same thickness as the unit on the sketch. That way, you can relate the information back to the drawing without having to sort through the information.
In the notes, you can be more precise about the colour of the rock, the precise grain size, staining, sedimentary structures, amount of organic material, and anything else that you can’t represent on the sketch.
Now, that we have an idea about how to set up the field notebook, let’s get into the thick of it.
Badlands are a type of dry terrain where softer sedimentary rocks, such as unconsolidated sands, silts and clays, and clay-rich soils have been extensively eroded. They are characterized by steep slopes, minimal vegetation, lack of a substantial regolith, and high drainage density.
The difference in height from the surrounding terrain; the amount of variation in elevation and slope in a particular area.
A trip made by students or research workers to study something at first hand. In geology is one of the most prized experiences.
All the minerals in a rock.
The remains or impression of a prehistoric organism preserved in petrified form or as a mold or cast in rock.
The science that deals with the earth's physical structure and substance, its history, and the processes that act on it.
The elevation of a geographic location is its height above or below a fixed reference point, most commonly a reference geoid, a mathematical model of the Earth's sea level as an equipotential gravitational surface.
In geography, latitude is a geographic coordinate that specifies the north–south position of a point on the Earth's surface. Latitude is an angle which ranges from 0° at the Equator to 90° at the poles. Lines of constant latitude, or parallels, run east–west as circles parallel to the equator.
Longitude is a geographic coordinate that specifies the east–west position of a point on the Earth's surface, or the surface of a celestial body. It is an angular measurement, usually expressed in degrees and denoted by the Greek letter lambda. Meridians connect points with the same longitude. The prime meridian goes through Greenwich, London, UK and has the value of 0. Measured from the prime meridian, 180 degrees to the East will define the Eastern Hemisphere, while 180 degrees to the West of Greenwich will define the Western Hemisphere.
An instrument used to measure the altitude of an object above a fixed level. In most cases, the fixed level is the average sea level which has a value of 0m. The measurement of altitude is called altimetry, which is related to the term bathymetry, the measurement of depth under water.
In geology, lamination is a small-scale sequence of fine layers that occurs in sedimentary rocks. Laminae are normally smaller and less pronounced than bedding. Lamination is often regarded as planar structures one centimetre or less in thickness, whereas bedding layers are greater than one centimetre.
