2 Chapter 2. Digging deeper
Learning Objectives
Before embarking in afield trip a little bit of background research should be done. Consequently, at the end of this chapter the student will
- learn the importance of the physical location of the study area.
- understand the relevance of the collecting as much data as possible before the field trip related to the climate and the geology of the area.
- comprehend the need to look at the geological history of an area.
- be aware of the relevance of picking the right tools for the job.
2.1. Introduction
In the previous chapter we introduced a general overview of all the things you should be doing before embarking in a field trip. Now, let’s dig deeper into the specifics of the field trip to the Avonlea Badlands in Southern Saskatchewan. We’re going to travel virtually in space and in time, as a geological field trip is not only a lateral movement across the surface, but also a travel in time following the clues provided by rocks and fossils. But in order to embark in this adventure, we should get ourselves a little prepared. First we’re going to look at maps to see where exactly are located the Avonlea Badlands. We’re going to collect data about relief, climate, vegetation and rock types so that we know what expect, what tools and personal items we should pack. After that, we’re going to travel further in time so we can understand the processes that gave the area the present aspect.
So, buckle your virtual seat belt as we’re starting in this adventure!
2.2. Space travel
2.2.1. Saskatchewan? Where is that?
If you are already in Saskatchewan or if you ever went through this place, than you already know the answer to this question. Saskatchewan is the Canadian province located east of Alberta, west of Manitoba, south of the Northwestern Territories and north of US states Montana and North Dakota. We’ve mentioned before that the Avonlea Badlands are located in Southern Saskatchewan. And for a lot of people born and raised in this wonderful province that will be enough to have an idea about localization and maybe even about the landscape. But if you’re a newcomer to this province, Saskatchewan sounds initially like a made-up name so that the Hollywood directors can use it in their movies because it sounds exotic and funny at the same time.
But the name of the Province of Saskatchewan is not a made up name. It is the name given in 1882 to one of the districts of what was then the Northwest Territories. And the name itself has a story with deep roots in the aboriginal history of the province. At that time, the Cree name for the Saskatchewan River was “Kisiskatchewanisipi,” meaning “swift-flowing river.” Remember that we’re talking about a time when the fur trade was flourishing and the rivers were the main traveling ways. It was also a time when agricultural land did not have much relevance. Consequently, the name of the waterways stayed, and through common use, this eight-syllable name was shortened to Saskatchewan.
Because we’ve mentioned the history of the name of the province, we should acknowledge that both University of Regina and the Avonlea Badlands are located on Treaty 4 lands (Figure 2.1). These are the territories of the nêhiyawak, Anihšināpēk, Dakota, Lakota, and Nakoda, and the homeland of the Métis/Michif Nation. Today, these lands continue to be the shared Territory of many diverse peoples from near and far.

2.2.2. Let’s talk geography
The world is a big place and some places are harder to locate than others. For example, everyone knows where Himalaya Mountains are and can easily pinpoint their location on the map of the world. It is not the case of the Avonlea Badlands. Consequently, let’s start from the beginning and let’s talk geography.
We’ve already established that the Avonlea Badlands are located in Southern Saskatchewan, which is a province in Canada, that is at its own turn a very big country found on the North American continent. This will be the perfect time to get out a map of the world and try to identify and localize all the geographical elements mentioned prior: North American continent, Canada and Saskatchewan. How did it go? No problem? Perfect. Now we have a relative idea where the badlands are located in the big picture.
But let us zoom in this amazing area. At this point, the map of the world is not going to be of big help, so we’ll have to switch to a local map showing the town of Avonlea on it or to a satellite view from Google Earth. On the satellite view is really easy to pick out the Avonlea Badlands as the area is bright white against the green coloured vegetated land (Fig. 2.2). And here we are! We managed to locate precisely the study area and if we want to be very scientific we can also indicate the absolute coordinates. That way, not only we will be able to find it again, but also other people interested in the Avonlea Badlands could locate them easily. On the map, you can see that the Avonlea Badlands are oriented in a general NW – SE orientation. Consequently, let’s give the coordinates in the same order. The NW corner of the Avonlea Badlands lays at about 50.0313 latitude N and at about -104.9928 longitude W, while the SE corner has the absolute coordinates of 50.0237 latitude N and -104.9814 longitude W. Do you remember how to use the latitude and longitude coordinate system? How are the lines oriented? Perfect! Let’s have a quick little review to make sure.
Fig 2.2. Globe – Canada – drone image
The absolute coordinates are good to have if you have a map or a GPS system; and hope the technology won’t fail you. Else, you could find the Badlands the old fashion way. Listen to the narration of people that have been there before. The narration is still a very important way of convening information to somebody. Do you remember asking your friend how to get to their house for the first time? They narrate the directions: Go north on X street, turn east on Y street, and so on. Nowadays it is very common to drop you a pin on a map and to send an image. But if the technology fails, be prepared to remember the narrative (fig. 2.3).

The Avonlea Badlands are located on a private land, approximately 50 km SW of Regina, the capital of Saskatchewan, Canada, by a scenic golf course near the town of Avonlea. There is a little makeshift parking lot on the side of the road, before crossing the golf course in front of a locked cattle gate. The visit has to be arranged through the Heritage Museum in Avonlea and their guides will be more than happy to show you the way.
Now, that we got closer to the area, let’s look at the relief. The study area is almost invisible to the researcher until staying on its very edge. In order to reach the destination, one has to walk about half of a km from the road, heading north on a flat or very gentle slopping land. Once at the edge, the beauty of the area leaves you breathless. It is impressive and it all unfolds under your eyes. The badlands area looks like a massive, weirdly-shaped bowl painted in shades of gray and yellow. The sides are steep and crumbly making the descent a little treacherous in dry weather as if you fall on it, it will feel like thousands of cement needles are trying to take your skin off. In rainy weather, the badlands turn into a sort of gigantic trap for anyone trying to visit or leave the area; the steep slopes turn into massive mud slides coating boots and pants making the ascent of the few tens of meters from the bottom to the edge, mission impossible.
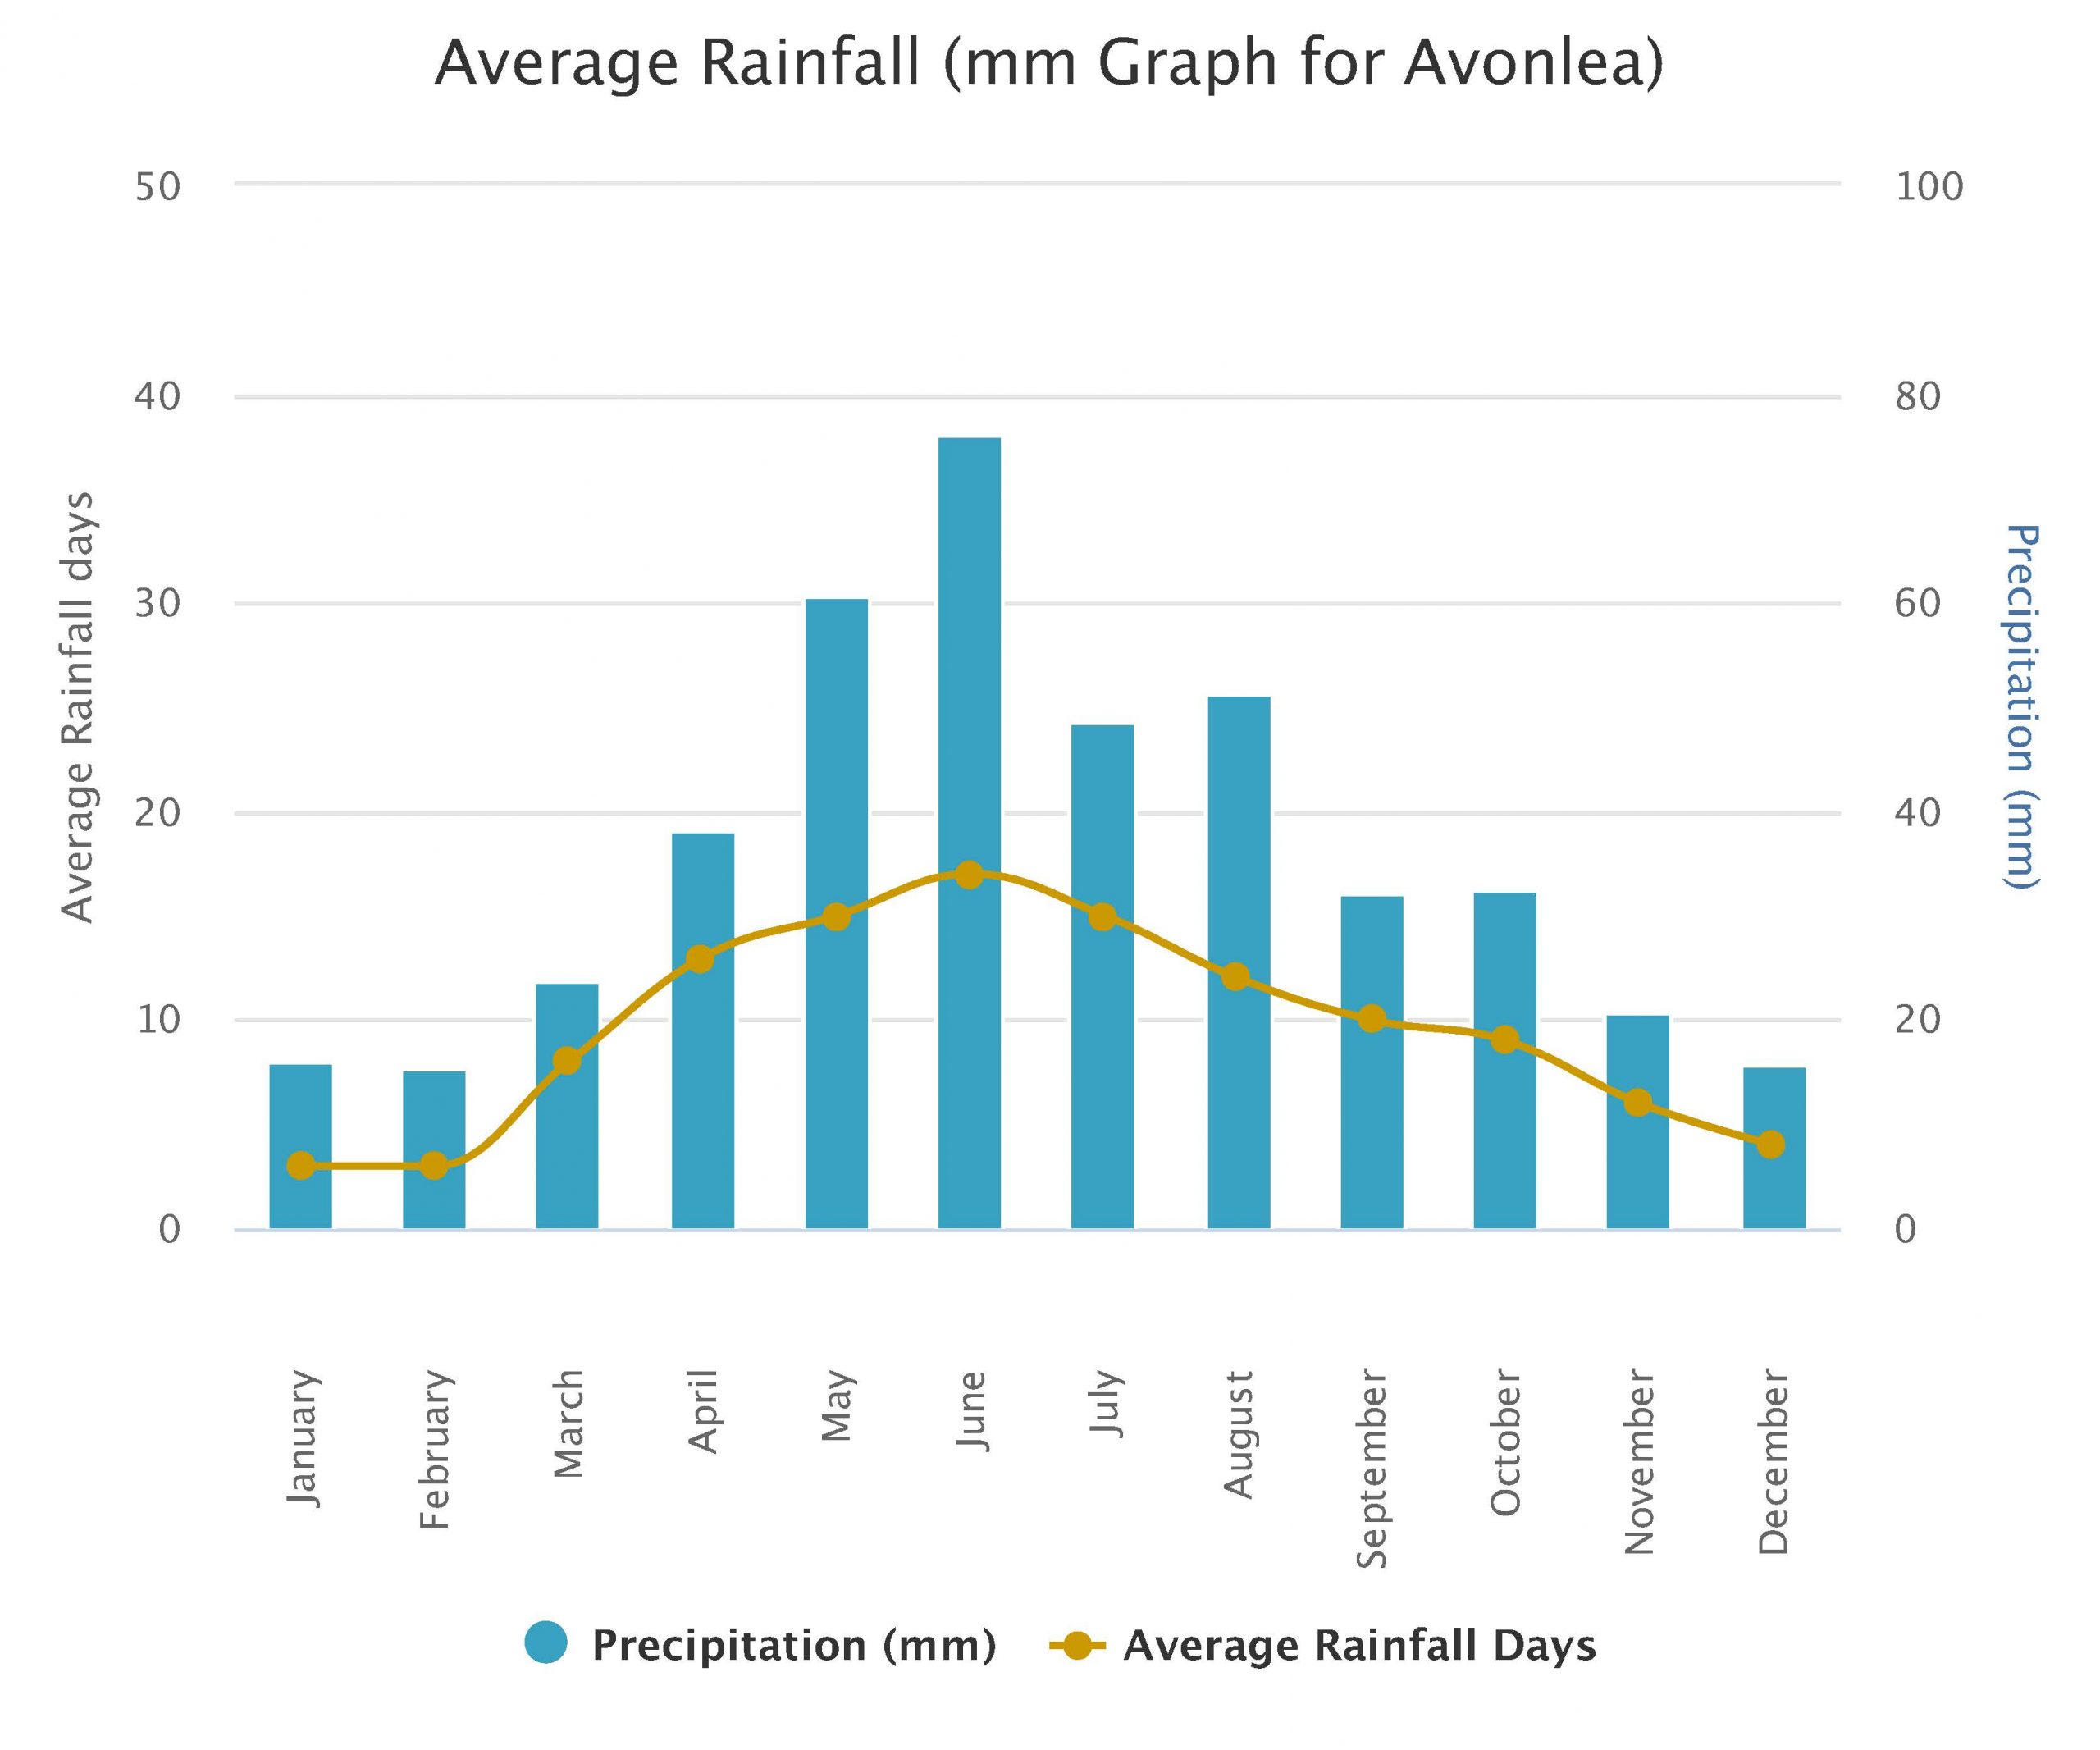
For most of the summer, the continental climate in southern Saskatchewan is an ally. The dry and hot summers keep the rock layers hard. The slopes exposed to the erosion get covered in a crumbly texture, known as the popcorn texture. Do not get fooled by the nice name! If you slip and fall on these slopes it will feel like you’re hitting hard rugged concrete! But if it rains, the best thing to do is to stay away! The good part is that in this part of the province it barely ever rains in a normal summer. Let’s have a look at a climograph for the last 12 years with the average temperatures and precipitation for every month of the year (Fig. 2.4) for the area around Avonlea! That should help with the planning! The day that we went out to film all this material it was during the last week of July in 2020 and we managed to pick the hottest day of the year with temperatures above 40°C. And obviously, winter is out of the question as it will be very hard to have a look at the rocks when they are covered with snow, or when the temperature is below 20°C.
Due to both dry climate and the lithology, which we’ll cover later, the vegetation is sparse in the Badlands, with the exception of some hearty bushes and some grass patches. Above the badlands, it is a different story. Up here, native lush grasses are covering the surface. But as you’ve probably noticed by now, I have not mentioned any trees. There is no shade in sight, so keep that in mind when you pack for the field trip! The only trees in the area are found along the creek that crosses the golf course, way out of reach! And of course keep your eyes open for the low-lying cacti that are spread everywhere, somewhat hidden by the tall grasses. It is not a pleasant feeling when you’re landing on one.
A few thousands of years back, very recently when we’re looking at the long Earth’s history, the glaciers incised deeply into the earth to provide us with an insight into the Late Cretaceous Eastend Formation. The play between the dry climate and the rock type made it possible to preserve the work of the glaciers. Nowadays, the sharp incision, carved by the glaciers about 15000 years ago, exposes two major poorly-consolidated units, a yellow sandy one and a greyish clay-dominated one.
Check point
2.3. Time Travel
In the previous section we traveled on the globe to the North American continent to find Canada and locate within the Southern Saskatchewan the hidden area of the Avonlea Badlands. All that lateral traveling has a set of absolute coordinate as our space travel destination. In this section, we’re going to travel back in time, about 66 Ma ago, to a moment where dinosaurs such as mighty Tyrannosaurus rex were still the rulers of the land. And while our trip is not going to be as dramatic as the trip in Jurassic Park, it is going to be full of clues to discover and interpret the environment of the past and the processes that gave the badlands their present aspect.
2.3.1. Geological history of Avonlea Badlands
Key Takeaways
Type your key takeaways here.
- First
- Second
Area
We could cut to the chase and just provide you with a detailed description of the two units exposed in the badlands, but that will not allow you to see the bigger picture and will also not answer the why, what, when, and how, types of questions that you might have. Consequently, with your permission let us have a quick look at the geological history of the Avonlea Badlands.
During the Mesozoic, Saskatchewan, located on the North American tectonic plate, continues its migration towards the north, farther and farther away from the equator and consequently farther away from the warm climates that allowed for the boom of reef environments during the Paleozoic. Those Paleozoic reefs are well known today in both Saskatchewan and Alberta for hosting important oil and gas resources.
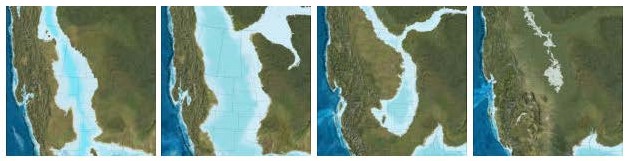
During most of the Mesozoic, Saskatchewan was covered by the Western Interior Seaway, a shallow epicontinental sea, which at times, connected the Arctic Ocean and the Golf of Mexico (Fig. 2.5.) One more thing worth to mention is that the Cretaceous Era is known as a period of global warming conditions with high concentrations of atmospheric CO2 and high eustatic sea level (Hay et al., 1993; Hay, 2008; Haq, 2014; Sames et al., 2016). The extent of the Western Interior Seaway was probably determined by the global eustatic sea level.
At the same time that Saskatchewan is traveling northward, there is a squishing movement happening involving the Farallon, Kuna and North American tectonic plates on a W-E directions. This west-east movement is known in the geological world as the Cordilleran Orogeny and it is the process that created the mountainous chain bordering the western edge of the North American continent. The importance to us is the fact that the Rocky Mountains start to emerge in Alberta, to the west of Saskatchewan, creating a retroarc foreland basin to the east (Broughan, 1984) in which siliciclastic sediments accumulated. The last phase of the Cordilleran Orogeny is known as the Laramide Orogeny and with the onset and intensification of this last phase, new land began to build east of the Rocky Mountains. The emerging Rocky Mountains turned into an important source of terrestrial sediments that accumulated in the retroarc foreland basin east of the mountain chain. The result of the combination between marine sediments and siliciclastic input is a westward thinning marine sediments and eastward thinning terrestrial sediments (Broughan, 1984).
As seen in figure 2.5, the sea level of the Western Interior Seaway highly fluctuated during the Cretaceous. The last period of the Western Interior Seaway is known as the Bearpaw Sea which deposited the marine shales of the Bearpaw Formation. The regression of the Bearpaw Sea allowed for the deposition of Eastend Formation, a unit of terrestrial-dominated sediments. The Eastend Formation marks the transition from marine sediments of the Bearpaw Formation to the non-marine sediments of the Whitemud Formation (Appendix 1).
The exposed geological unit in the Avonlea Badlands belongs to the Eastend Formation.
To date, no relevant vertebrate or invertebrate fossils remains have been identified in the Eastend Formation. The plant matter in the unit is poorly preserved, fragmented and localized in small laminas in the lower part of the formation. Fragments of both marine and terrestrial organisms have been found in outcrops in other parts of the province, but they are scarce and poorly preserved. Basically no amazing full T-rex skeletons have been found in this formation! The only fossil indication discovered in the Avonlea Badlands area are trace fossils belonging to the Skolithos ichnofacies, indicating shallow rocky shores (Boulding, 2019).
The Cretaceous sediments were covered by Tertiary and Quaternary sediments making their study in outcrop really hard. Fortunately, the geologists had an unexpected ally: the glacial period during the Pleistocene. Basically, very recently considering that the last deglaciation period is assumed to have started in Saskatchewan about 18 ka BP. Around 8 ka BP Saskatchewan was virtually free of the ice sheet! During the advance and the retreat of the glaciers, they carved the glacial spillways, cutting into the older sediments allowing geologists to study Cretaceous deposits in outcrops as well and not only on cores (Saskatchewan Geological Survey, 2003).
And here we are. We traveled laterally on the surface of the Earth to get to the Avonlea Badlands and we traveled in time to understand the geological processes that created the Avonlea Badlands. Now, let’s start to get even closer and travel on a vertical scale. We’re going to get into a lot of details in the next chapter. But for now, let’s mention that even for the untrained eye, the Eastend Fomation in the Avonlea Badlands can be divided in two lithological units based on their texture, composition and colour.
The upper yellowish sand unit (Fig. 2.6.) is relatively uniform in colour and is composed of medium to coarse sand showing massive cross-beds, and localized cemented sandstone that serves as the heads of the hoodoos in the area.

Check point
The lower unit is clay-dominated (Fig. 2.6), has almost a repetitive pattern of colour variations and is characterized by cm-scale parallel laminations. Some laminations are enriched in organic matter. Two very predominant features of this lower unit are the massive flame structures on the order of cm to m, and the omnipresent popcorn texture on the slopes.
Check point
The Avonlea Badlands are cut by a fault line running on a general orientation NW to SE that lifts up the northern block exposing at the surface the clay-dominated unit. The fault is marked by fibrous calcite crystals associated with a consolidated sandstone unit.
More details in the next chapter! Now, let’s take a little bit of time to talk about the equipment needed so that we are fully prepared to tackle the field trip – virtual or not!
2.4. I need you right now
We mentioned in passing in the previous chapter the geological tools that you could possibly load in your backpack and the fact that the tools should match both the purpose of the field trip and be appropriate for the rock type. We just figured out that the rocks we’re targeting are poorly consolidated sand and clay layers. Would it make sense to carry a sledge hammer to the area? Of course not! Consequently, let’s have a look at all the tools that we should pack considering the rock type in the Avonlea Badlands.
The geological tools required for the purpose of this field trip will be: GPS, altimeter, magnetic compass, shovel, trowel, brush, Munsell Chart, hand lens, hydrochloridic acid, ruler, Jacob's staff, hammer, sample bags and permanent markers, pencils, and notebook. To this list, that is by no means exhaustive, you can add protection glasses, camera, gloves and maps. But from loading them into our backpacks to actually understanding the uses of each one of them it is a world of distance. So, let’s start with the beginning.
2.4.1. GPS
The GPS has turned in the last few years in an absolute tool to have during a field trip in order to determine the absolute location at a specific point. The accuracy of the GPS is highly dependent on a few factors: the calibration, the right datum and the weather. Before starting to use the GPS make sure that it is calibrated. A GPS is very easy to calibrate, but it is also very easy to forget to do it. Depending on the model of GPS, you’ll have to go to Settings, find the Calibration option and follow the instructions on the screen.
The right datum is a little bit of a complicated story. You always have to use the same datum as the map that you’re looking at. There are a lot of geodetic datum available for use, and depending on the preference for one mathematical model or other of the map makers, the “commonly used” geodetic datum can differ from continent to continent but also from country to country. To make the story short, make sure that you check the reference map to see which datum they’ve used and set your GPS to the same datum. Once you set the datum, you might as well set the coordinate system, which again is a question of preference. For example, in Europe, the latitude and longitude coordinate system is the norm, while in Canada a lot is done using the UTM coordinate system. You can set the GPS to either system, as long as you understand how to read the coordinates!
Lastly, the GPS is highly dependent on the weather, and it tends to be more accurate in a sunny day. The error margin can increase considerably if it is overcast, so make sure when you use the GPS to make a note about the cloud cover.
While the GPS is nice to have, there are a few great disadvantages. For one, they tend to be expensive if you want high quality. And second, you’ll need a computer to download the coordinates and plot those coordinates on a map to accurately locate yourself. Unless you do it by hand! Another part that is a little bit unnatural is that you can’t Zoom out to see the physical features to make sure that you are there.
Like everything that is related to technology, the GPS is in danger of being replaced by that one device that almost everyone has in their back pocket, the omnipresent cellphone. In the last few years, the cellphones have evolved greatly and now you can find your localization very easy. Where the GPS is sluggish, the cellphone excels. With a cellphone you can get the coordinates without worrying about the datum. You can also Zoom in and out of the area to make sure that the place where you think you are is exactly that. Who knows, in the future, your cellphone might be able to convince the satellite to take a picture of you on the outcrop, like from a drone!
Key Takeaways
2.4.2. Altimeter
The altimeter is a very precise tool in determining the elevation of an unknown point, as long as it is calibrated properly. To calibrate the altimeter is a little bit of a complex story and each altimeter comes with its own set of instructions on how to do it. The one thing that you absolutely need in order for your altimeter to be calibrated is the elevation of a known point. Consequently, do not go in the field thinking that you’re going to calibrate the altimeter once you get there, unless you are sure that there is a point with a known elevation. If you made it to the field and you have no idea about the elevation, your altimeter is of little use.
If you are at the University in Regina, the closest point with a known elevation is on the north side, barely in the park. You’ll have to cross the University Drive N, and in that corner created by the University Drive N, Wascana Parkway and the walking path search for a metal round plate in the grass. The metal plate will have written on it the elevation at that specific point. Set down the altimeter next to it, make sure it is in the shade and then follow the instructions on how to calibrate it. For obvious reasons, it will be easier to calibrate the altimeter during the summer!
While the altimeters are very precise, they can be very sensitive as well, so pay attention to the way you handle it! You’ll noticed that most times, the altimeters come in their own case and they never leave it! This delicate handling of the altimeter is the reason why sometimes the altimeters are left behind when going in the field trips. Too sensible to survive the rocky trip!
2.4.3. Magnetic compass
The magnetic compass is one of those timeless tools that looks pretty similar now to when it was invented. This tool is absolute indispensable if you need to measure geological features such as bedding, fault planes, folds orientations, and the paleocurrent. Because it is magnetic, there are a few things to be taken into consideration.
For one, make sure that you know the correct value for the magnetic declination for your work area. The magnetic pole migrates every year, and in consequence, the angle between the true north and the magnetic north varies every year. This angle between the geographic north and the magnetic north is known as the magnetic declination. For example, using 10 year old magnetic declination value to measure in 2022 the geological features within the Avonlea Badlands is going to give you very different values than those measured in 2012. The updated value for the magnetic declination can be found on the internet with a simple Google search. Armed with the right value for the magnetic declination, make sure that you adjust your compass for the work area.
How do you adjust the compass? There are a few elements that we have to locate first: the metal wedge or key attached to the string that hopefully it is still there, the small screw on the metal or plastic edge of the compass, the very small middle line inside the thick arrow that points always to the north inside the compass, and the 0 value written in very small numbers in a series that goes only to 90 degrees either east or west. Did you locate all these elements? Let’s see. Each compass comes equipped with a little metal wedge or key attached to the string. Locate on the edge of the compass the little screw. Using the metal wedge, rotate slowly the little screw until the very small middle line is not set on 0 anymore but on the right value of the magnetic declination. Attention, when we said that you have to rotate the screw very slowly, we meant it! Some compasses do not like rotations over 20 degrees and they will be upset about that! What we mean is that they will not work properly and the values obtained using “upset” compasses are going to be useless.
Now, let’s get back to adjusting the compass to the magnetic declination in the field trip area! Let’s assume that the magnetic declination is 10 degrees East. When you finish rotating the little screw with the metal wedge or key, that small middle line should be on 10 degrees east. It sounds complicated, but you’ll see it is easier to do than to explain. You can also watch the video below to see how you can set up the compass to make sure that you are where you want to be.
I hope that you’re feeling more comfortable now adjusting for magnetic declination.
Remember, we said that there are a few things to be aware of? The second worry that you might have is that the compass is magnetic. The friend is the foe as well. Consequently, do not use metallic objects to help you when you measure geological features. The opposite is true as well. It will be very hard to measure the geological features of units that are highly magnetic.
The good old compass is in the same position as the GPS lately. The new apps developed for the cellphone to measure geological features try to replace the use of the compass. And in a pinch it will do. The one thing that still has it going for the magnetic compass is that it doesn’t need power nor internet to function.
2.4.4. Shovel and/ or trowel
Yes, you read correctly! Shovel! The tool used in gardening or in construction can be very useful during a geological field trip as well. Why? The simple answer is because not all rocks are the same. Some will be extremely hard such as igneous rocks. Some will turn hard during the geological processes, such as some metamorphic and even sedimentary rocks. But some, will be too soft and too crumbly to effectively use a hammer.
Moreover, those soft and crumbly rocks will be strongly affected by the weathering and erosion processes. To make the matter worse, if they are very fine grained like clays and silts, these rocks will create forms of relief with shallow slopes upon which material coming from above will deposit. In order to get to the rock, you’ll have to … DIG! Trying to do that with the hammer will be a long and painful process. Consequently, the trusty shovel will come to the rescue.
Now, just because you are having a shovel, it does not mean that you’ll remove the whole hill! You just have to dig enough to get to the fresh rock so you can describe it accurately.
Once you are satisfied with the size of the hole, set the shovel aside. You’ll need to get closer to the rock in order to describe it and at this precise time, the shovel might be a little bit like an elephant in a china shop. The shovel served you well to dig enough to expose the rock. No worries, you’ll get back to the shovel when the work is all done, as you’ll have to make sure that you put back the material into the hole as best as you can. Remember that in the case of the Avonlea Badlands, we are on private land and we have to be respectful of that! Moreover, if the land is used for cattle grazing, the holes can be deadly to the animals.
Key Takeaways
2.4.5. Putting knife / spatula
As mentioned above, once the rock is exposed, the shovel turns into a foe by destroying all geological structures. At this precise time, the putting knife or the spatula becomes your best friend.
Like with every other tool, there are secrets on how to use it to obtain the best result. In this precise case, gently scrape the surface of the fresh rock with the putting knife only in a horizontal manner. Moving the putting knife vertically will damage the sedimentary structures and you’ll have to dig some more. The putting knife will uncover a fresh flat surface and you can almost see the structures. You can also use the putting knife to get a sample of the rock. But overall, the putting knife’s job is done and it is time for the next tool, the brush.
2.4.6. Brush
The brush is used to finish the job of the putting knife, and it is used in the same manner. Gently brush the freshly uncovered surface in an horizontal manner to eliminate the dust and the material that might have fallen there or been carried there. Remember, it is not supposed to be a vigorous sweeping of the surface but rather a gentle stroke of paint brush on a work of art.
When you are happy with the exposed surface, the brush job is done and you can start digging into the geology.
2.4.7. Munsell Chart
Because one of the first thing to notice is the colour, let’s start with the Munsell Chart. Obviously, you can describe colour just by looking at the rock, right! So what is this need to complicate the matter? Well, true, we all see colours, but each one of us can describe the colours slightly different. What might be grey for somebody could be a light olive grey to somebody else. Consequently, the Munsell Chart has been designed with that purpose in mind – to unify the colour system so that when somebody on the North American continent describes a rock, a sediment or a soil, somebody from Europe can see the precise colour.
The Munsell Chart is generally used for loose sediments and for soils as those colours can varry greatly, and as such it will be a great tool to have in the Avonlea Badlands. How we use it? We will talk more about the Munsell Chart in the next chapter.
Key Takeaways
2.4.8. Hand lens
We determined and recorded the colour and we are ready to tackle the geology. The next step is crucial in understanding the geological processes and determining the environment and yet is using one of the most humble tools – the hand lens. This tool does not need power nor internet to function, but rather a steady hand and a keen eye. Depending on the magnification power, the hand lens will make it easier to see details either of the mineral grains or of the fossils analyzed.
The hand lens is used with two main purposes in mind: to identify the mineralogical composition of the sediment or rock and to determine the grain textures present. The mineralogy is relevant because it helps classify the rock or the sediment, it makes the connection with the source, and it can be used to explain some of the diagenetic processes. The grain textures are relevant because they will be used to infer features of the depositional environment such as water energy, relative distance of transport, etc. The mineralogical and the grain textures aspects, together with the sedimentary structures will complete the picture revealing the geological history of the study area.
2.4.9. Hydrochloric acid
The sediments and the rocks go through a lot after deposition. Sometimes, new fluids charged with dissolved minerals would go through the sedimentary layer and precipitate cements that will turn non consolidated sediments into rocks. Some of the most common cements involve iron oxides or hydroxides, calcite, and silica.
The iron oxides are easily recognized because of the colours. They will usually “paint” the rocks in hues of yellow, brown and even bright red and purples. One amazing example of the iron oxide staining is the rock formation called the Wave located in Arizona, U.S. shown in Fig. 2.7. Notice at the top of the page that the layes seems to change orientation. It is a beautiful example of cross-bedding.

The calcareous cement, while not as spectacular as the iron oxides cement, is still very easy to identify by using a few drops of hydrochloric acid. The calcite will react strongly and readily with the acid producing a small effervecence foam on the surface of the rock that can be heard. The more calcite, the stronger the reaction.
The silica cement is most common identified by what it is not, more than by what it is. Because it is made mostly by quartz is hard and it doesn’ react with the acid. Also, it is not coloured in the amazing colours of the iron oxides.
2.4.10. Ruler tape measure or Jacob's staff
Once you got acquinted with the rock formation, the next step is to determine the thickness of the specific layers. Depending on the scale, this activity can be done using a meter-long ruler, a tape measure or a Jacob's staff. The most important part is to not measure along the slope, but rather estimate the thickness using simple geometry.
The most precise method, and obviously the one that will take the most amount of time, is to measure the “lenght” of the bed along the slope with one of the measuring tools and then determine the slope angle using the compass. Applying the trigonometry funtion of
cos of angle of slope = thickness of bed / lenght along the slope,
you can easily determine the thickness of the sedimentary layer.
If you have a good amount of time you can play using the math, but if you do not have a lot of time, you can use the Jacob's Staff for the “quick and dirty” method. The thing to remember again is that the Jacob's staff is 2m in lenght, and the divisions are 1m, 50 cm, and 5 smaller divisions of 10 cm each.
Whatever method you choose, do not get stressed out! It doesn’t make too much of a difference if the thickness of the bed is 104m or 104.17m.
2.4.11. Hammer
The hammer is the tool that every geologist takes along. It is handy to break a rock, dig a little, or use it as a support. Humoristically put, the hammer is like a brand new grown appendix to the geologists. Without a hammer, a geologist will feel naked, no matter if they go in holiday or to do field work.
As banal as the hammer might look, there are even amongst hammers differences, depending on the type of rock you intend to hit. The hard rock hammers will have a pointy end, while the other one will be flat and square. The soft rock hammers will still have the flat and square end, but the other end will be flat looking like a small spatula or like a chisel.
Obviously, try to avoid hitting yourself with the hammer, as it will hurt. And, if you plan to hit any hard rocks amke sure you are wearing the safety glasses to protect your eyes from rock shards flying everywhere.
2.4.12.Sample Bags and permanent markers
You are almost done the studying of the rock formation and decide to get same samples for the lab where you can observe them calmly under the stereoscope. You can just take a fistful of sediment and throwing it in your bagpack, but that might not help much at the end of the field trip.
That’s when the sample bags are turning handy. When chosing sample bags you still have to have present the type of rocks you’re going to sample. Plastic bags are useful for the soft, loose sediments but will be almost completely useless for hard rocks that can tear them apart. Textile material bags will be better for hard rock, but will not help you much with soft sediments. Once you have decided upon the right type of sample bags, you can choose the markers as well.
Each sample will have to be labeled, both on the rock and on the bag in the case of hard rocks or just the bag for loose sediments. The pencil will not help you as it just to faint or it doesn’t write. The pen, while visible, can be washed away or be smeared if the sample bag lands in water. Dry eraser markers will not do the job either as they are too easy to erase. Consequently, when planning the field trip make sure that you pick up some permanent markers that are not to thick or too thin.
2.4.13. Pencils
As hilariously as this might sound, this might be the tool that is the hardest to convince people to bring it along. Pencils are amazing! You can use them in the rain! They do not wash up! They are easy to carry, but a little harder to sharpen in the middle of nowhere.
The pen, the most common replacement for the pencil, is completely the opposite. Once the paper is wet, the pen won’t write. If it starts raining the pages written in pen will cry out their data in blue ink and you’ll never be able to recover the information.
One piece of advice! Bring a few pencils with you in the field! You’ll be happy you did it!
2.4.14.Notebook
Finally, the notebook is the absolute tool to have in the field. The memory gets fuzzy after a few stops and the information forms a mountain of data that combines into one big mess. The notebook is that tool that keeps it all organized. Consequently, make sure that you pick one that is Rite in the Rain type and let’s see in the next chapters how to organize it so you can make the best out of it.
A trip made by students or research workers to study something at first hand. In geology is one of the most prized experiences.
The science that deals with the earth's physical structure and substance, its history, and the processes that act on it.
The geological history of Earth follows the major geological events in Earth's past based on the geological time scale, a system of chronological measurement based on the study of the planet's rock layers.
Badlands are a type of dry terrain where softer sedimentary rocks, such as unconsolidated sands, silts and clays, and clay-rich soils have been extensively eroded. They are characterized by steep slopes, minimal vegetation, lack of a substantial regolith, and high drainage density.
A map is a symbolic depiction emphasizing relationships between elements of some space, such as objects, regions, or themes. Many maps are static, fixed to paper or some other durable medium, while others are dynamic or interactive.
The difference in height from the surrounding terrain; the amount of variation in elevation and slope in a particular area.
The study of the physical features of the earth and its atmosphere, and of human activity as it affects and is affected by these, including the distribution of populations and resources, land use, and industries.
In geography, latitude is a geographic coordinate that specifies the north–south position of a point on the Earth's surface. Latitude is an angle which ranges from 0° at the Equator to 90° at the poles. Lines of constant latitude, or parallels, run east–west as circles parallel to the equator.
Longitude is a geographic coordinate that specifies the east–west position of a point on the Earth's surface, or the surface of a celestial body. It is an angular measurement, usually expressed in degrees and denoted by the Greek letter lambda. Meridians connect points with the same longitude. The prime meridian goes through Greenwich, London, UK and has the value of 0. Measured from the prime meridian, 180 degrees to the East will define the Eastern Hemisphere, while 180 degrees to the West of Greenwich will define the Western Hemisphere.
The geographic coordinate system (GCS) is a spherical or ellipsoidal coordinate system for measuring and communicating positions directly on the Earth as latitude and longitude. It is the simplest, oldest and most widely used of the various of spatial reference systems that are in use, and forms the basis for most others. Although latitude and longitude form a coordinate tuple like a cartesian coordinate system, the geographic coordinate system is not cartesian because the measurements are angles and are not on a planar surface.
In earth science, erosion is the action of surface processes that removes soil, rock, or dissolved material from one location on the Earth's crust, and then transports it to another location where it is deposited. Erosion is distinct from weathering which involves no movement.
A climograph is a graphical representation of a location's basic climate. Climographs display data for two variables: monthly average temperature and monthly average precipitation. These are useful tools to quickly describe a location's climate.
The lithology of a rock unit is a description of its physical characteristics visible at outcrop, in hand or core samples, or with low magnification microscopy. Physical characteristics include colour, texture, grain size, and composition.
A glacier is a large, perennial accumulation of crystalline ice, snow, rock, sediment, and often liquid water that originates on land and moves down slope under the influence of its own weight and gravity.
The Cretaceous is a geological period that lasted from about 145.5 to 65.5 million years ago. It is the third and final period of the Mesozoic Era, as well as the longest. At around 79 million years, it is the longest geological period of the entire Phanerozoic.
The Eastend Formation is a stratigraphical unit of Maastrichtian (Upper Cretaceous) age in the Western Canadian Sedimentary Basin. It takes its name from the town of Eastend, Saskatchewan, and was first described in outcrop around the settlement by L.S. Russell in 1932. The type locality was later defined south-west of the town by W.O. Kupsch in 1956.
Dinosaurs are a group of reptiles that dominated the land for over 140 million years (more than 160 million years in some parts of the world). They evolved diverse shapes and sizes, from the fearsome giant Spinosaurus to the chicken-sized Microraptor, and were able to survive in a variety of ecosystems.
The Mesozoic Era, also called the Age of Reptiles and the Age of Conifers, is the second-to-last era of Earth's geological history, lasting from about 252 to 66 million years ago and comprising the Triassic, Jurassic and Cretaceous Periods.
A massive slab of solid rock made up of Earth's lithosphere (crust and upper mantle). Also called lithospheric plate. Plate tectonics is the generally accepted scientific theory that considers the Earth's lithosphere to comprise a number of large tectonic plates which have been slowly moving since about 3.4 billion years ago.
The Equator is a circle of latitude, about 40,075 km in circumference, that divides Earth into the Northern and Southern hemispheres. It is an imaginary line located at 0 degrees latitude, halfway between the North and South poles.
A chain of rocks or coral or a ridge of sand at or near the surface of water. In this case is referring to coral reefs, such as the Great Barrier Reef in Australia.
The Paleozoic Era is the earliest of three geologic eras of the Phanerozoic Eon. It is the longest of the Phanerozoic eras, lasting from 538.8 to 251.902 million years ago, and is subdivided into six geologic periods: the Cambrian, Ordovician, Silurian, Devonian, Carboniferous, and Permian.
The Western Interior Seaway was a large inland sea that existed from the early Late Cretaceous to earliest Paleocene, splitting the continent of North America into two landmasses, Laramidia to the west and Appalachia to the east.
An epicontinental or inland sea is a continental body of water which is very large and is either completely surrounded by dry land or connected to an ocean by a river, strait, or "arm of the sea". An inland sea will generally have higher salinity than a freshwater lake, but usually lower salinity than the open ocean.
The eustatic sea level is the distance from the center of the earth to the sea surface. An increase of the eustatic sea level can be generated by decreasing glaciation, increasing spreading rates of the mid-ocean ridges or more mid-oceanic ridges.
The Farallon plate was an ancient, very large large oceanic plate. The formerly Farallon Plate it was progressively consumed beneath the North American and Caribbean Plates, leaving only the present-day Juan de Fuca, Rivera, and Cocos Plates as small remnants.
The Cordilleran Orogeny began in the late Triassic and ended in early Tertiary. Its strongest effects occurred between the middle Jurassic and the end Cretaceous, so it is commonly referred to as a late Mesozoic orogeny. The Cordilleran Orogeny had a complex development, producing different features in different regions. The Cordilleran Orogeny created a mountain chain that extends for 8,000 km along the western side of North America from Alaska to Guatemala and Honduras, with a width of 650–1,600 km.
A type of back-arc basin which is floored by continental crust. The main sediments are fluvial, deltaic, or marine, derived from the uplifted area behind the arc.
A foreland basin is a structural basin that develops adjacent and parallel to a mountain belt. Foreland basins form because the immense mass created by crustal thickening associated with the evolution of a mountain belt causes the lithosphere to bend, by a process known as lithospheric flexure.
The Laramide orogeny was a time period of mountain building in western North America, which started in the Late Cretaceous, 70 to 80 million years ago, and ended 35 to 55 million years ago. The exact duration and ages of beginning and end of the orogeny are in dispute.
The Bearpaw Sea, a warm, shallow sea, covered 1.7 million square kilometres of coastal plain, including what is now Alberta, about 74 million years ago. The Bearpaw Sea was home to many marine reptiles, ammonites, fishes, and other aquatic life. The Bearpaw Sea receded about 72 million years ago, leaving a thick layer of marine deposits known as the Bearpaw Formation. This is the formation that forms the base of the hoodoos east of Drumheller, Alberta.
The Bearpaw Formation, also called the Bearpaw Shale, is a geologic formation of Late Cretaceous age. It outcrops in the U.S. state of Montana, as well as the Canadian provinces of Alberta and Saskatchewan, and was named for the Bear Paw Mountains in Montana.
The Whitemud Formation is a geologic formation of Late Cretaceous (Maastrichtian) age in the Western Canada Sedimentary Basin. It is present through the plains of southern Saskatchewan, southeastern Alberta and south-central Alberta. Named by N.B. Davis in 1918, the formation is characterized by white kaolinitic clay and is a source of high-quality refractory clay. The type locality has been designated as Dempster's clay pit northwest of Eastend, Saskatchewan.
An animal of a large group distinguished by the possession of a backbone or spinal column, including mammals, birds, reptiles, amphibians, and fishes.
An animal lacking a backbone, such as an arthropod, mollusk, annelid, coelenterate, etc. The invertebrates constitute an artificial division of the animal kingdom, comprising 95 percent of animal species and about 30 different phyla.
The remains or impression of a prehistoric organism preserved in petrified form or as a mold or cast in rock.
A fine layer (~ 1 mm thick) in strata, also called a lamina, common in fine-grained sedimentary rocks such as shale, siltstone and fine sandstone. A sedimentary bed comprises multiple laminations, or laminae.
A rock formation that is visible on the surface.
Tertiary Period, former official interval of geologic time lasting from approximately 66 million to 2.6 million years ago. It is the traditional name for the first of two periods in the Cenozoic Era (66 million years ago to the present); the second is the Quaternary Period (2.6 million years ago to the present). The Tertiary has five principal subdivisions, called epochs, which from oldest to youngest are the Paleocene (66 million to 55.8 million years ago), Eocene (55.8 million to 33.9 million years ago), Oligocene (33.9 million to 23 million years ago), Miocene (23 million to 5.3 million years ago), and Pliocene (5.3 million to 2.6 million years ago).
Quaternary, in the geologic history of Earth is a unit of time within the Cenozoic Era, beginning 2,588,000 years ago and continuing to the present day. The Quaternary has been characterized by several periods of glaciation (the “ice ages” of common lore), when ice sheets many kilometres thick have covered vast areas of the continents in temperate areas. During and between these glacial periods, rapid changes in climate and sea level have occurred, and environments worldwide have been altered. These variations in turn have driven rapid changes in life-forms, both flora and fauna. Beginning some 200,000 years ago, they were responsible for the rise of modern humans.
The Quaternary is one of the best-studied parts of the geologic record. In part this is because it is well preserved in comparison with the other periods of geologic time. Less of it has been lost to erosion, and the sediments are not usually altered by rock-forming processes. Quaternary rocks and sediments, being the most recently laid geologic strata, can be found at or near the surface of the Earth in valleys and on plains, seashores, and even the seafloor. These deposits are important for unraveling geologic history because they are most easily compared to modern sedimentary deposits. The environments and geologic processes earlier in the period were similar to those of today; a large proportion of Quaternary fossils are related to living organisms; and numerous dating techniques can be used to provide relatively precise timing of events and rates of change.
Pleistocene Epoch, earlier and major of the two epochs that constitute the Quaternary Period of Earth’s history, an epoch during which a succession of glacial and interglacial climatic cycles occurred. The base of the Gelasian Stage (2,588,000 to 1,800,000 years ago) marks the beginning of Pleistocene, which is also the base of the Quarternary Period. The Pleistocene ended 11,700 years ago. It is preceded by the Pliocene Epoch of the Neogene Period and is followed by the Holocene Epoch.
The Pleistocene Epoch is best known as a time during which extensive ice sheets and other glaciers formed repeatedly on the landmasses and has been informally referred to as the “Great Ice Age.”
General term for a glacial drainage channel cut by water during glaciation, and normally including three varieties: (a) channels cut by water escaping from a glacially impounded lake (see OVERFLOW CHANNEL); (b) channels cut by meltwater released from a decaying glacier (see MELTWATER CHANNEL); and (c) channels cut by a stream deflected by an advancing glacier.
A cylindrical rock fragment drilled and removed from the subsurface. Some cores can be hundreds of meters in total length divided in fragments of 0.75m.
Cross-bedding (or cross-stratification) is a primary sedimentary feature characterized by layers that intersect at an angle with each other through planar erosional surfaces that truncate inclined beds and laminae. This structure is the result of the migration of bedforms, such as dunes, ripples, and megaripples, produced by wind or water currents in sand-rich sediment.
A sedimentary rock consisting of sand sized particles. The grains - quartz, feldspar, lithics, or a mixture of - can be cemented together or not. Typically red, yellow, or brown in color.
A natural column of rock in western North America often in fantastic form. If you'd like, a lot of them look like fantastic giant mushrooms with a sandstone head over a clay-rich stem.
In geology, lamination is a small-scale sequence of fine layers that occurs in sedimentary rocks. Laminae are normally smaller and less pronounced than bedding. Lamination is often regarded as planar structures one centimetre or less in thickness, whereas bedding layers are greater than one centimetre.
A flame structure is a type of soft-sediment deformation that forms in unconsolidated sediments. The weight of an overlying bed forces an underlying bed to push up through the overlying bed, generally when both strata are saturated with water. The resulting pattern (in cross section) may resemble flames.
A fault is a fracture or zone of fractures between two blocks of rock. Faults allow the blocks to move relative to each other. A fault can be easily identified as the layer of rock is not continuous but it moved up or down relative to the other side of the fault.
Calcite is a carbonate mineral and the most stable polymorph of calcium carbonate (CaCO3). It is a very common mineral, particularly as a component of limestone. Calcite reacts readily with hydrochloric acid and can be scratched with a penny. It is the main reason for the hard water.
An instrument used to measure the altitude of an object above a fixed level. In most cases, the fixed level is the average sea level which has a value of 0m. The measurement of altitude is called altimetry, which is related to the term bathymetry, the measurement of depth under water.
The Munsell Color System describes a soil’s color, based on Hue, Value & Chroma. The Munsell Chart is a collection of color chips with varying degrees of hue, value & chroma. Take a small soil sample and match it up with the appropriate color chip to determine that soil’s Munsell “code.”
HUES tell you how red the soil is… 2.5YR (2.5 parts yellow to 1 red) is pretty red; 10YR (10 parts yellow to 1 red) is more yellow…
VALUES tell you how dark the soil is; A horizons are darker, with a lower value (2 or 3) due to humus. E horizons are often light colored (5 or 6 value).
CHROMA tells you how bright vs. dull the soil is; a low chroma (2 or less) means the soil is GREY, hence wet or waterlogged; higher chromas mean better drained, more oxidized soil.
In surveying, a jacob staff is a single straight rod or staff made of nonferrous material, pointed and metal-clad at the bottom for penetrating the ground. Here, it is used to describe a 2m wooden rod that is painted in alternating strips of white and black to show the following divisions: 1m, 50 cm, and 5 strips of 10 cm each.
Calibration is the process of configuring an instrument to provide a result for a sample within an acceptable range. Eliminating or minimizing factors that cause inaccurate measurements is a fundamental aspect of instrumentation design.
In surveying and geodesy, a datum is a set of reference points on the earth's surface against which position measurements are made, and (often) an associated model of the shape of the earth (reference ellipsoid) to define a geographic coordinate system.
A geodetic datum or geodetic system is a global datum reference or reference frame for precisely representing the position of locations on Earth or other planetary bodies by means of geodetic coordinates.
Within the World Geodetic System (WGS), there are several different datums that have been in use throughout the years. These are WGS 84, 72, 70, and 60. The WGS 84 is currently the one in use for this system and is valid until 2010. In addition, it is one of the most widely used datums around the world.
he Universal Transverse Mercator (UTM) is a map projection system for assigning coordinates to locations on the surface of the Earth. Like the traditional method of latitude and longitude, it is a horizontal position representation, which means it ignores altitude and treats the earth as a perfect ellipsoid. However, it differs from global latitude/longitude in that it divides earth into 60 zones and projects each to the plane as a basis for its coordinates. Specifying a location means specifying the zone and the x, y coordinate in that plane. The projection from spheroid to a UTM zone is some parameterization of the transverse Mercator projection. The parameters vary by nation or region or mapping system.
The elevation of a geographic location is its height above or below a fixed reference point, most commonly a reference geoid, a mathematical model of the Earth's sea level as an equipotential gravitational surface.
In structural geology, a fold is a stack of originally planar surfaces, such as sedimentary strata, that are bent or curved during permanent deformation. Folds in rocks vary in size from microscopic crinkles to mountain-sized folds. They occur as single isolated folds or in periodic sets.
A paleocurrent or paleocurrent indicator is a geological feature (typically a sedimentary structure) that helps one determine the direction of flowing water in the geologic past. This is an invaluable tool in the reconstruction of ancient depositional environments.
There are two main types of paleocurrent indicators:
Unidirectional, which give a clear, single direction of flow
Bidirectional, which give a good linear direction, but it is unclear which direction along the linear trend the water flowed.
Paleocurrents are usually measured with an azimuth, or as a rake on a bedding plane, and displayed with a Rose Diagram to show the dominant direction(s) of flow. This is needed because in some depositional environments, like meandering rivers, the paleocurrent resulting from natural sinuosity has a natural variation of 180 degrees or more.
Magnetic declination, or magnetic variation, is the angle on the horizontal plane between magnetic north (the direction the north end of a magnetized compass needle points, corresponding to the direction of the Earth's magnetic field lines) and true north (the direction along a meridian towards the geographic North Pole). This angle varies depending on position on the Earth's surface and changes over time.
By convention, declination is positive when magnetic north is east of true north, and negative when it is to the west.
A very broad terms referring to any physical feature on the surface of the Earth, such as mountains, hills, valleys, etc, but also to all features resulted from geological processes, such as folds, faults, etc.
Weathering is the deterioration of rocks, soils and minerals as well as wood and artificial materials through contact with water, atmospheric gases, and biological organisms.
A geological contact is a boundary which separates one rock body from another. A contact can be formed during deposition, by the intrusion of magma, or through faulting or other deformation of rock beds that brings distinct rock bodies into contact.
All the minerals in a rock.
All the processes that affect a rock after its deposition.
