EST Desktop
EST DESKTOP
The Canada Post EST Desktop program is used to send:
- All USA and International Lending items
- Returns in Canada that did not have a prepaid label
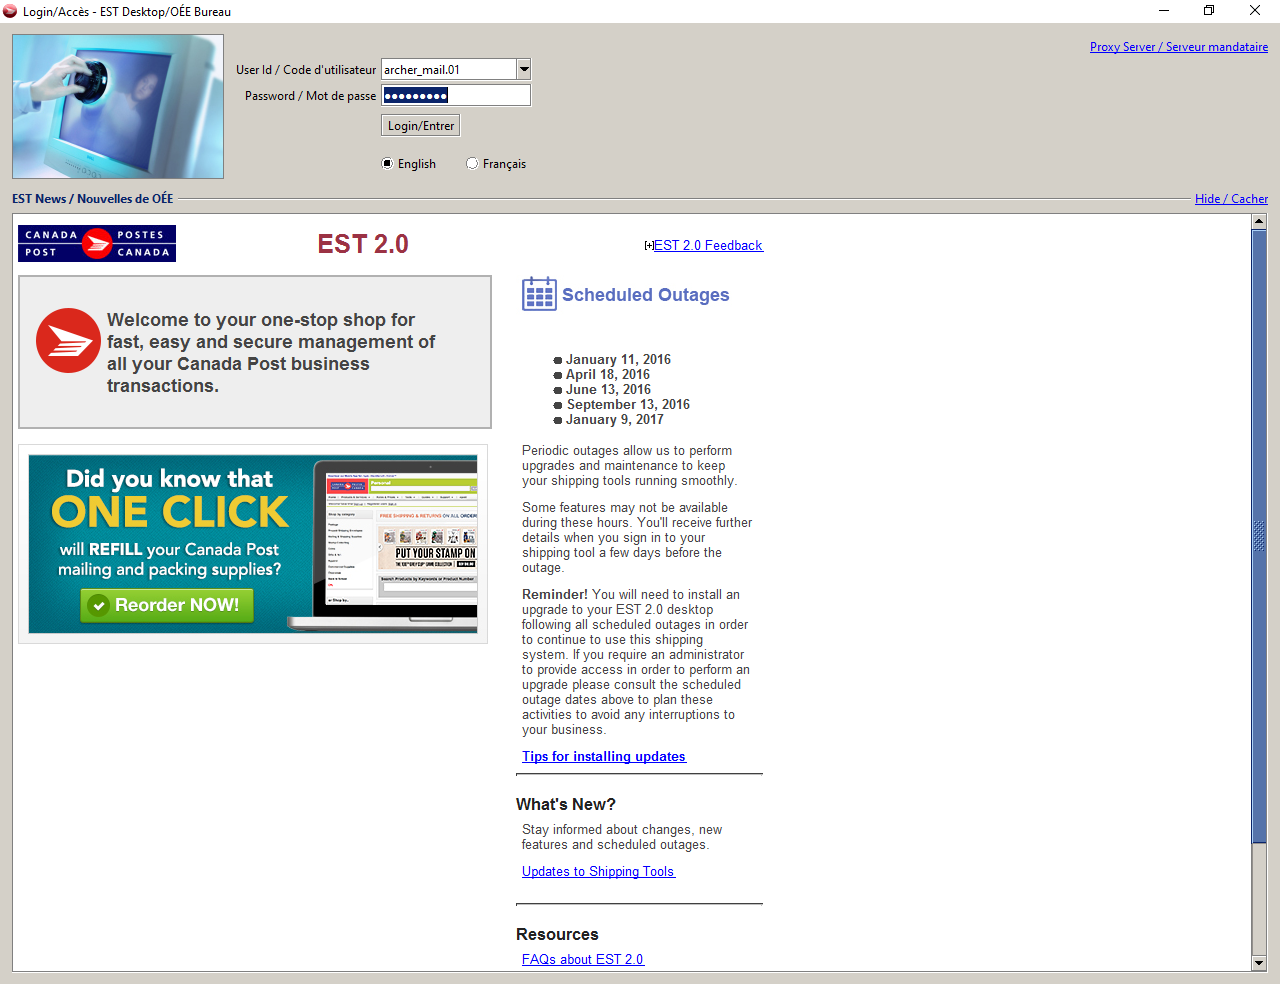
- Open EST 2.0
- User ID: archer_mail.01
- Password: Interlib!
- Click Log in
CANADIAN SHIPMENTS
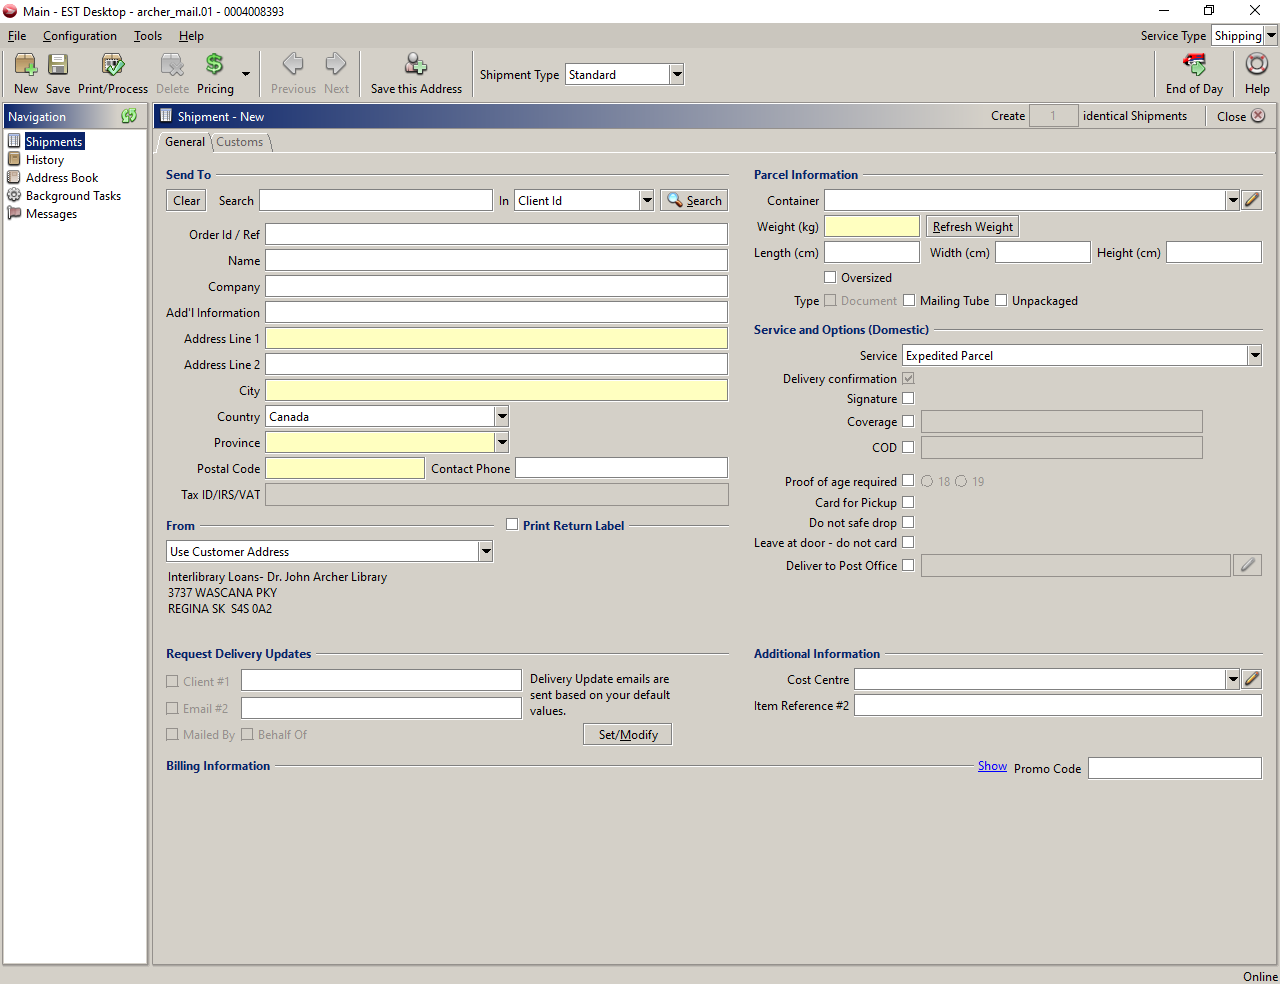
- General Tab – Enter information – see mailing label provided by Interlibrary Loans
- Sent to
- Reference #1 – Interlibrary Loans
- Name/Company/Address/City/Country/Postal Code
- Phone – NA (Can be blank)
- From
- Select Use Customer Address
- Parcel Information
- Weight/Length/Width/Height – See Interlibrary Loans Mail
- Service and Options
- Canada- Expedited Parcel – Expedited is chosen so that a tracking number is included
- Coverage – Enter $100.00
- Billing Information
- Contract – 40805056
- Paid by Customer – 0004008393 – University of Regina
- Method of Payment – Account
- Click Print Process

- Click Print
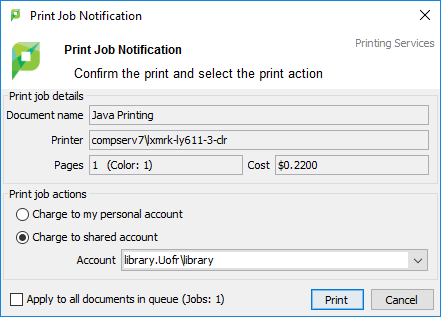
- Once you have printed the window will clear and your next shipment can be entered
- When all Canadian, USA and International shipments have been entered go to End of Day Instructions noted below
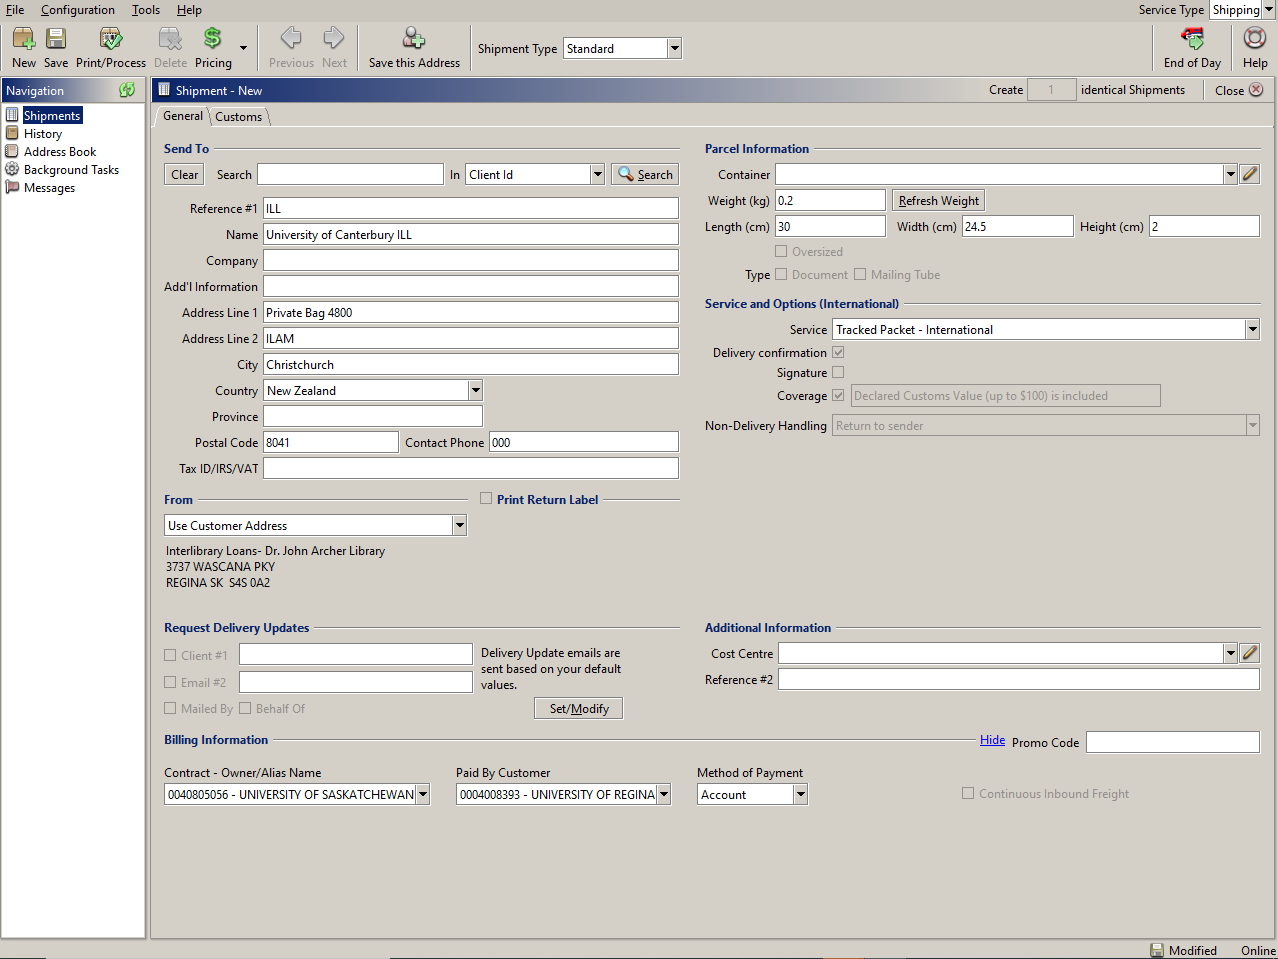
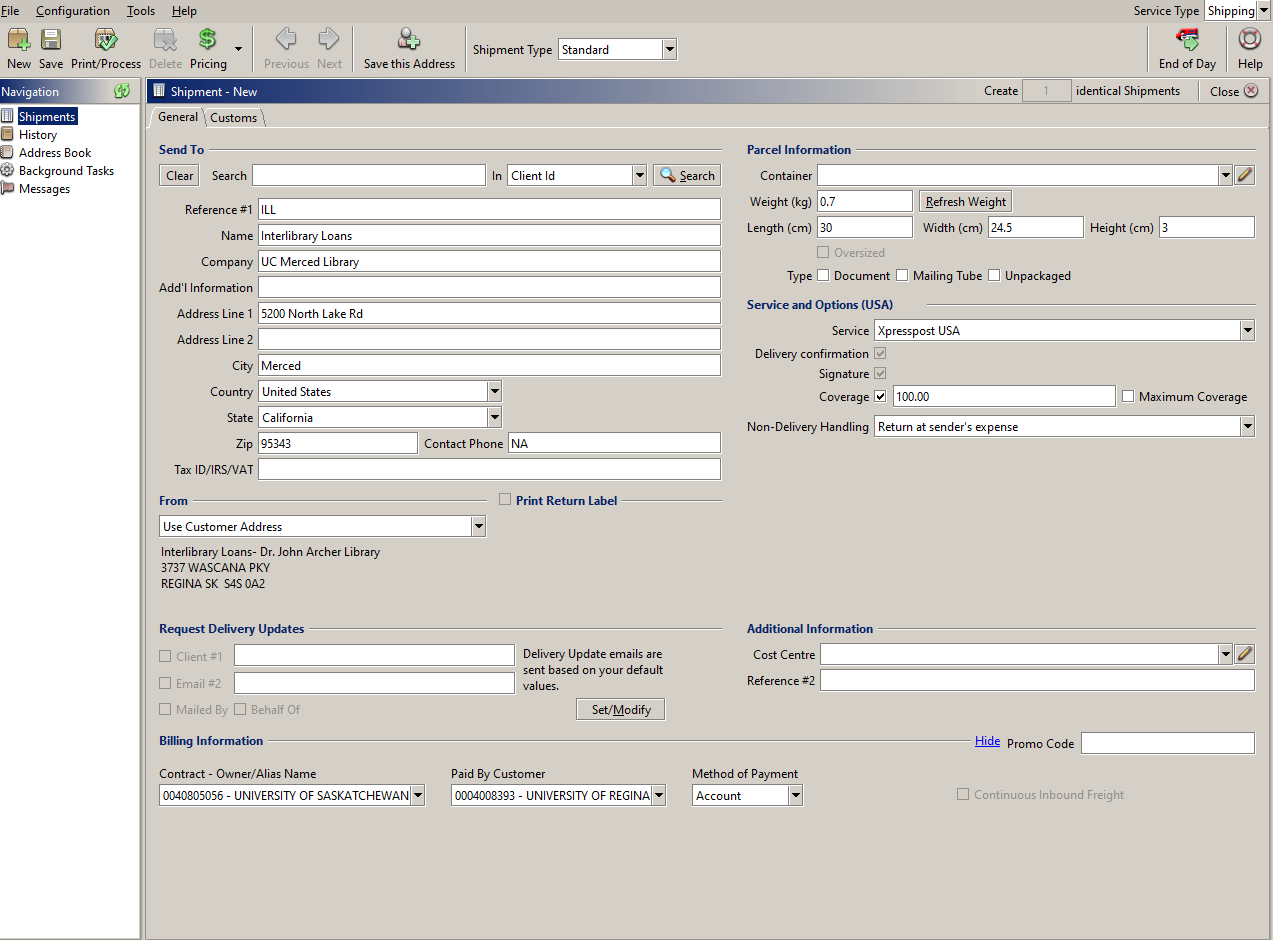
USA AND INTERNATIONAL PACKAGES
- General Tab – Enter information – see mailing label provided by Interlibrary Loans
- Sent to
- Reference #1 – Interlibrary Loans
- Name/Company/Address/City/Country/Postal Code
- Phone – 00 (Must be numbers)
- From
- Select Use Customer Address
- Parcel Information
- Weight/Length/Width/Height – See Interlibrary Loans Mail
- Service and Options
- Service – USA:
- Select – Tracked Packet-USA -if available (tracking number and less rate)
- Coverage: Default coverage is $100 and auto populates
- Non-Delivering Handling: Defaults return to Sender
- Select- Xpresspost USA (tracking number but highest rate)
- Coverage- Enter $100.00
- Non-Delivery Handling – Select Return at Sender’s Expense
- Do not use Small Packet USA – NO tracking Number provided
- Service – International:
- Select – Tracked Packet – International – if available (tracking number and less rate)
- Coverage: Default is $100 and auto populates
- Non-Delivering Handling: Defaults return to Sender
- Select -Xpresspost International (tracking number but highest rate)
- Coverage- Enter $100.00
- Non-Delivery Handling – Select Return at Sender’s Expense
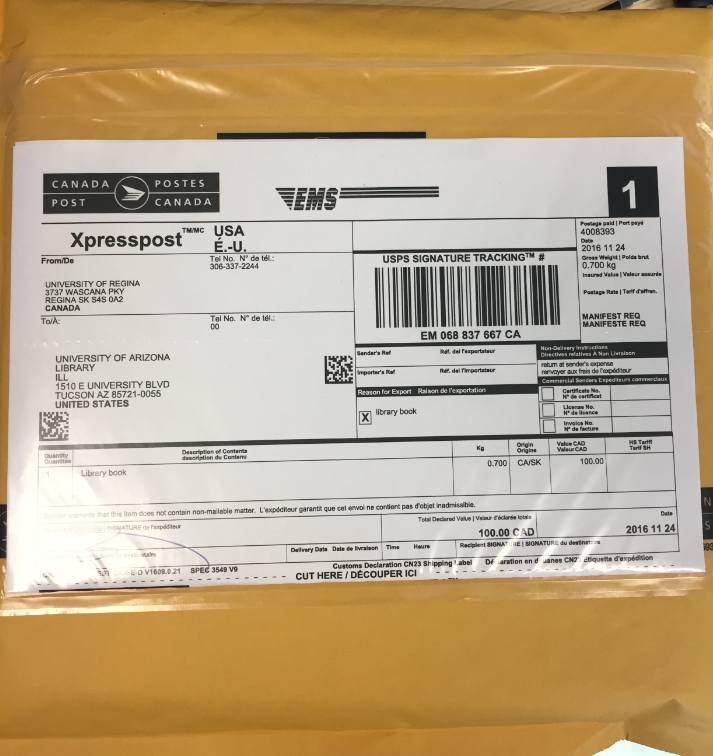
- Example Tracked Packet
- Example Xpresspost

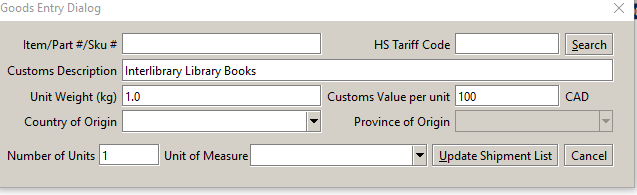
- Select Customs Tab
- Click Drop Down – Predefined Goods (First USA/International Shipment Only)
- Select Interlibrary Loan Books
- Select Add to List
- Click Edit
- Unit Weight – Enter weight of package, this must match the information you entered on the general page
- Click Update Shipment List
- Click Print Process
- Click Print
- Once you have printed the window will clear on the General tab and your next shipment can be entered
- NOTE: The Customs tab does not clear, when creating the next international shipment you do not need to use the drop down predefined goods
- Highlight existing line Click Edit

- Update with new weight and click update shipment list
- Continue to follow all above procedures until all items are shipped
- When all Canadian, USA and International shipments have been entered go to End of Day Instructions noted below
END OF DAY
- Click End of Day
- Enter Customer Reference #
- Double click beside each manifest and Enter ILL-Library
- Click Transmit/Print
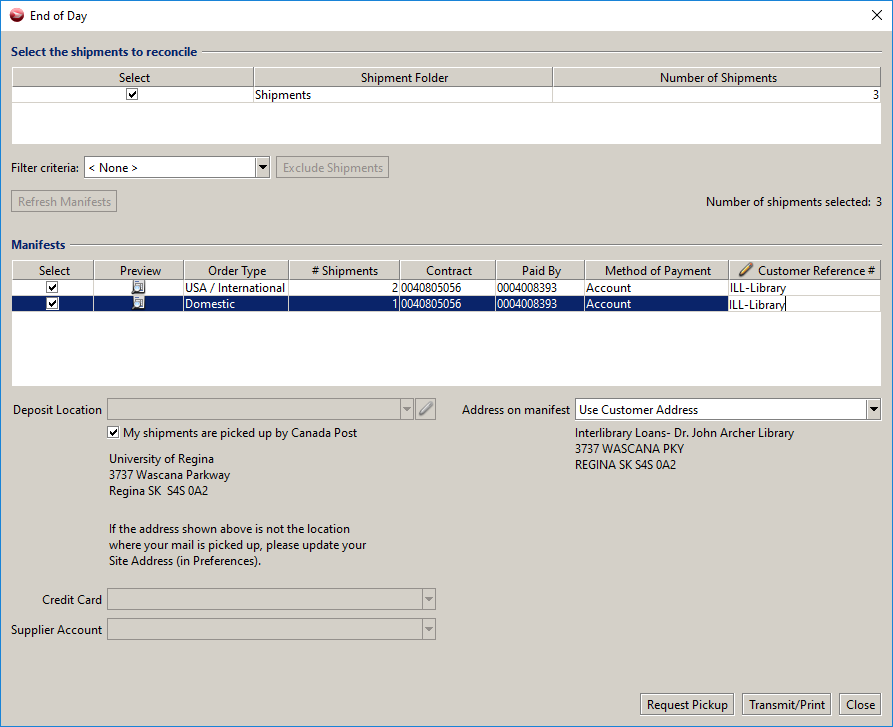
- Click Print

Retention of Mailing Labels and Manifest
- Scan all mailing labels and email to yourself from the mailroom printer, include both the shipping labels and manifest
- Forward your email to cheryl.aldous@uregina.ca
- All labels will be saved to:
- T:\library\Technical Services_Collections\TechServ\Mail Tracking Labels\EST Manifests\’YEAR’\’MONTH’
- All labels will be retained as follows:
- Current Year
- Previous Year
- delete any prior years annually
Packaging
- Place parcels on the table in order from last to first
- Match the paperwork to the parcel
- Remove ILL address label and place in metal basket on the table by the return cart
- Place the sending label in the labelope and seal
- Canada/USA – One shipping Label per labelope
- International – 2 shipping labels are required in the labelope
- Example USA Parcel
- Place all packages in the cart to take down to the UR Mail Room
Manifests
- Sign USA and International Manifests
- Full set (3 copies) to be sent to UR Mail Room – place in the cart
- Currently 2 copies are coming back from the mailroom:
- ILL related manifests can be recycled
- Non-ILL manifests should be placed in Karen Wiome mailbox, add a post-it stating NOT ILL